I recently bought a new laptop and went through the hassle of setting up Git SSH key again. There are many guides somewhere on the Internet but it’s all over different places and they tell you to do different things with different outcomes. Also, the guide from GitHub is less than ideal as it requires using “Git Bash” which I do not like. So I’m writing things down for my future reference.
Enable OpenSSH on Windows
For newer systems, like Windows 10 and above, OpenSSH comes with Windows, but it may not yet be enabled by default. So go find Windows settings’ optional features and make sure “OpenSSH Client” is enabled.
Even after the feature is enabled, there is a SSH Agent that would still be disabled. So go to Services (Win + R and then services.msc), find “OpenSSH Authentication Agent”, double-click to open its Properties, and change the option Startup Type to Automatic (Delayed Start). Also, since you’re here, if the service is not running, you should start it.

Beta Version of OpenSSH Client
Note that the OpenSSH Client that comes from Windows could be a few years old and may have bugs. If are more daring, like me, you can opt for the beta version of OpenSSH Client. In particular, when I did the above, I found that I couldn’t successfully clone a GitHub repo because the SSH connection kept being dropped, and I wasn’t the only one facing that issue. So I had to switch to the beta version and it worked like charm.
To install this beta version, what I need to do is to open Windows Terminal, using the Powershell:
winget install --id Microsoft.OpenSSH.Beta
With this method, you should notice that the program is installed in “C:\Program Files” and not “C:\Windows\System32”
Find the system’s environment variable settings and verify that “C:\Program Files\OpenSSH” is listed in the “Path” variable. If not, then add it.

After this, if you restarted the Terminal (PowerShell) and then execute:
where.exe ssh
You should expect that “C:\Program Files\OpenSSH\ssh.exe” is the one on top:
PS > where.exe ssh
C:\Program Files\OpenSSH\ssh.exe
C:\Windows\System32\OpenSSH\ssh.exe
With that install, by right, “OpenSSH Authentication Agent” shown in services.msc should point to “C:\Program Files\OpenSSH”

Install Git for Windows
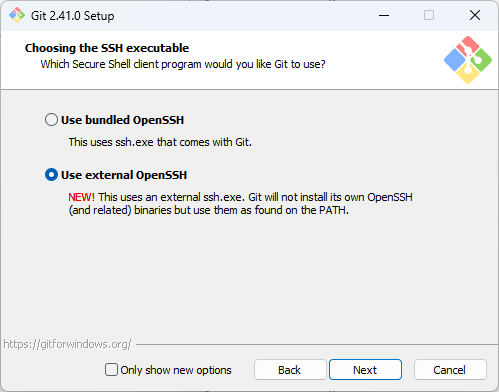
Then, go ahead and install Git for Windows. Most of the default settings are fine as is. For me, I’ve chosen to use VS Code as default editor. At the prompt “Choosing SSH executable”, you should choose “Use external OpenSSH”. This is because we want to use the SSH client that comes with Windows.
Generate Key Pair
After this, you can generate a SSH key pair on Windows Terminal: either PowerShell or Command Prompt is fine.
ssh-keygen -t ed25519 -C "<COMMENT>"
The “-C” argument passes a comment. You can change it to whatever you want, put your e-mail and the purpose of this key.
Follow the prompts: it should ask you the location to save the key, and whether you want to set a passphrase or not.
For key location, you can leave it as default, which will be generated at “C:\Users\$USERNAME\.ssh\id_ed25519” (where “$USERNAME” is your current user directory name). If you change the location, take note of the location as it will be used later on.
For passphrase, I recommend setting a passphrase to make it more secure so that if someone are able to gain access to the key files, they would still need the passphrase to decode it.
Add Key to SSH Agent
After generating the key pair, you should add it to the current SSH agent.
First, we should ensure that the SSH agent is running. In PowerShell or Command Prompt, run the following:
start-ssh-agentThen, we can add the key to the SSH agent using “ssh-add” command. Replace “path\to\key” with the path to the key pair location generated in the previous section.
ssh-add path\to\the\keyIf it asks for the passphrase, provide it. You will only need to provide the passphrase this time only. The SSH Agent that comes with Windows should be able to auto-decode the key when the service starts.
Add Key to GitHub
After this, you can add the SSH public key to your GitHub account. After that, you should be able to clone repositories using SSH.
And we’re done!
Notes
In older guides where OpenSSH Client is not bundled from Windows, you might either be guided to use OpenSSH client bundled together with Git for Windows, or use PuTTY/Pageant program. Both approaches are good enough, however they can be annoying if you set a passphrase to your key-pair as both approaches will ask you for the passphrase when the service restarts.
Very nice tips! Thanks bro.